10 Steps to Make Soil Alkaline for Hydrangeas
Getting the right soil pH for hydrangeas can feel like a guessing game, especially when you’re hoping for healthier plants and beautiful blooms. You’re not alone—many gardeners struggle to know where to start. These 10 steps to make soil alkaline for hydrangeas can help you adjust pH carefully and choose the right products for your garden.
To make soil more alkaline for hydrangeas, first test its pH and set a modest target based on the plant and soil. Choose agricultural lime, then follow your soil test’s rate and product label; use dolomitic lime only if magnesium is low.
Spread it evenly across the root zone, keep it off stems and leaves, and water as directed. Avoid acidifiers, retest before adding more, and watch plant health. The steps below explain how to adjust pH safely over time.
Key Takeaways
- Test soil pH using samples from several spots in the hydrangea’s root zone, about four to six inches deep.
- Set a modest pH goal based on the test and plant health; don’t change pH just to alter flower color.
- Choose agricultural lime, using calcitic lime unless a soil test shows magnesium is low and dolomitic lime is needed.
- Calculate the amount from soil-test recommendations and product directions, adjusting for bed size and soil type.
- Spread lime evenly beneath the canopy, water as directed, and retest before applying more.
Test Your Hydrangea Soil pH
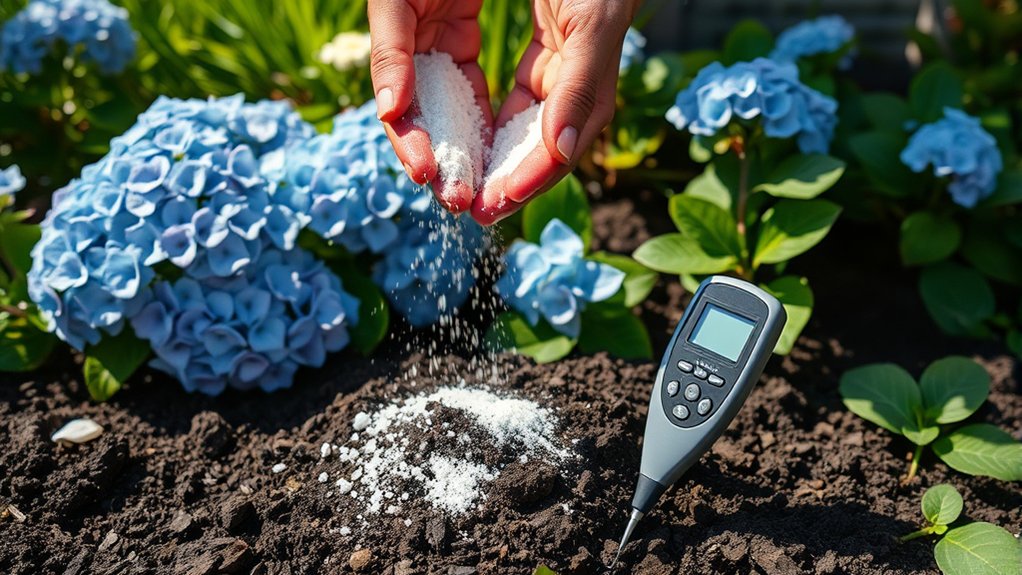
Before you try to make your soil more alkaline, test its pH to find out how much it needs to change. Use a home soil testing kit, a digital meter, or a laboratory service. Each option can help you understand your current pH balance, but follow the instructions carefully for reliable results.
Collect soil from several spots around your hydrangea, avoiding areas near fertilizer, compost, or recently added amendments. Remove mulch and surface debris, then take samples from the root zone, about four to six inches deep. Mix the samples in a clean container to create a representative test.
If you use a kit, measure the soil and water precisely, and wait the recommended time before reading the result. For a meter, clean the probe between readings and test multiple spots. A laboratory report may also show nutrient levels that affect your plant’s growth. Record the result and the date. Retest later using the same method to compare readings and track changes.
Set a Realistic Soil pH Goal

Once you know your soil’s pH, set a modest target rather than trying to change it dramatically. Hydrangeas generally grow well in slightly acidic to neutral soil, and a gradual shift toward neutral may suit your garden better than a strongly alkaline reading.
Aim for a modest pH adjustment; hydrangeas generally thrive in slightly acidic to neutral soil.
Your best goal depends on your starting pH, the plant’s condition, and the soil around its roots. Don’t chase a number just to influence bloom color; soil pH alone won’t reliably control it.
Before choosing a target, consider:
- Your current reading: Aim for a small, manageable adjustment, especially if your soil is far from neutral.
- Plant health: Keep growth and leaf condition in view, not just a pH figure.
- Soil balance: Protect soil structure and microbial activity by avoiding abrupt changes.
Set a target you can monitor over time. Recheck the soil after adjustments, then decide whether another small change makes sense. Patience helps you avoid stressing roots and disrupting the conditions your hydrangea needs to thrive.
Choose Lime to Raise Soil pH

To raise soil pH gradually, choose agricultural lime, which adds calcium and may also supply magnesium, depending on the product. You’ll find two common options: calcitic lime, made mostly from calcium carbonate, and dolomitic lime, which contains calcium and magnesium carbonates.
Choose calcitic lime if your soil already has enough magnesium. If a soil test shows low magnesium, dolomitic lime may address both needs. Don’t select lime based on hydrangea flower color; soil chemistry and variety determine color, while lime changes pH.
Check the product label before buying. Finer particles react faster, while pelletized lime is easier to spread and creates less dust. Either way, choose a product labeled for garden or agricultural use, not quicklime or hydrated lime, which can damage plants and pose handling risks.
Soil pH testing guides your choice and helps you track results. During Lime application, follow label directions and wear gloves and eye protection. Keep lime off foliage, and store it dry and sealed.
Calculate the Right Lime Amount
Test your soil’s pH before adding lime to find out how much it needs to rise. Then use your soil test results and the product instructions to calculate the right amount. This helps raise the pH without overliming.
Test Soil pH
Before adding lime, find out how acidic your soil is with a reliable pH test. Hydrangeas generally grow best in slightly acidic soil, so a result helps you judge whether the bed needs adjustment. Testing also protects nutrient balance and the soil microbiome from unnecessary changes.
- Collect samples from several spots around the hydrangea’s root zone, avoiding compost piles, fertilizer bands, and recently amended areas.
- Mix the samples in a clean container, then follow your test kit’s directions. For a more precise reading, send a composite sample to a local extension laboratory.
- Record the result and test again in a different season if conditions vary. Use the reading to understand your soil’s current acidity, not as a reason to add lime automatically.
Keep the report handy; it gives you a dependable starting point for decisions about soil care.
Calculate Lime Rate
Once you know your soil’s pH, calculate the lime rate from the test report rather than guessing. Check the recommended amount for your soil type, current pH, and target pH. Clay soil usually needs more lime than sandy soil because it resists pH change. Follow the report’s rate for your garden area, and measure the bed before buying or spreading lime.
If your report gives a rate per 1,000 square feet, scale it to your bed’s actual size. Apply only the recommended amount; excess lime can push pH too high and interfere with plant nutrition and mineral balance. Use the product label to convert the recommendation if it specifies a different lime type or application rate. When the report doesn’t provide guidance, contact your local extension office for a soil-specific calculation before applying any amendment.
Avoid Aluminum Sulfate and Acidifiers
To keep your soil alkaline, avoid aluminum sulfate and other soil acidifiers, which lower pH. Check product labels to make sure you don’t accidentally make your soil more acidic.
Skip Aluminum Sulfate
Skip aluminum sulfate and other acidifiers, such as sulfur and ammonium-based fertilizers, when you’re trying to raise soil pH. Aluminum sulfate lowers pH quickly, which works against your goal of creating alkaline soil for hydrangeas. It can also add soluble aluminum, so don’t use it as a routine soil amendment.
Instead, build your plan around measured changes and reliable soil science:
- Test your soil before adding amendments; a recent result gives you a useful starting point.
- Check the recommended pH range for your hydrangea variety, since preferences can vary.
- Choose a suitable alkaline amendment, then apply it at the labeled rate and retest before adding more.
For pH accuracy, use a dependable test and follow its instructions. Make gradual adjustments, because excessive amendments can stress roots and disrupt nutrient availability.
Avoid Soil Acidifiers
As you raise the soil pH, avoid acidifiers such as aluminum sulfate, elemental sulfur, and ammonium-based fertilizers. These products can lower pH and work against your effort to create alkaline soil. Check fertilizer labels before applying them; choose a balanced, phosphorus-rich formula that doesn’t contain acidifying ingredients. Don’t assume a product is safe just because it’s marketed for flowering plants.
Track pH with a soil test, then adjust gradually using an appropriate amendment, such as garden lime, according to the test results. Recheck the soil before adding more. This careful approach helps you maintain alkaline soil benefits without pushing pH too high, which can limit nutrient availability. If you want a hydrangea color change, remember that pH affects flower color mainly in bigleaf varieties, and results take time.
Spread Lime Around the Root Zone
Spread garden lime evenly over the soil beneath your hydrangea’s canopy, keeping it a few inches away from the stems. Apply it across the root zone, where fine roots can access the amendment. Don’t pile lime against the trunk or concentrate it in one spot; an even layer helps you avoid harsh patches that may stress roots.
Spread lime evenly beneath the hydrangea canopy, away from stems, to reach fine roots without creating concentrated patches.
- Check the product label for the recommended amount, since lime strength and soil needs vary.
- Use a hand spreader or gloved hand to distribute the measured dose consistently beneath the canopy.
- Keep lime off leaves, flowers, and stems; brush away any granules that land on the plant.
Choose lime timing that suits your soil test and the product directions, rather than applying extra to speed results. A gradual, measured approach supports hydrant health and helps you adjust soil conditions without overdoing it.
Note the amount and application date so you can compare future soil tests and make informed changes. Don’t repeat the treatment until testing shows it’s needed.
Water Soil as the Lime Label Directs
After applying lime, water the soil only as the product label directs. Check the lime labeling for specific watering instructions, since products differ in particle size, formulation, and application method. Some labels may recommend watering immediately to help move lime into the soil; others may not require it. Follow the directions rather than guessing.
Use a gentle stream so you don’t wash lime away from the root zone or expose roots through erosion. Aim to moisten the treated area evenly without leaving puddles. If the label calls for watering, apply enough to settle the material into the soil, not enough to saturate it. Good water balance supports steady movement while protecting hydrangea roots from waterlogged conditions.
If rain is expected, account for it only when the label allows rainfall to substitute for watering. Avoid watering during runoff or when the ground is already saturated. Keep the application area undisturbed, and follow any label guidance about when to resume routine irrigation.
Retest Soil Before Adding More Lime
Before adding more lime, retest the soil to see whether its pH has reached the range recommended for your hydrangea. Lime works gradually, so testing too soon can lead you to apply more than your soil needs.
Follow the product label’s waiting period, then collect a fresh sample from several spots around the root zone. Avoid sampling directly beside a lime granule, where the reading may not represent the bed.
Use a reliable soil test kit or send a sample to a local extension service. Keep your method consistent so you can compare results accurately.
If the pH remains below your target, consider these steps:
- Check the test instructions and confirm you prepared the sample correctly.
- Compare the result with your previous reading to assess the change.
- Review the label’s application rate before deciding whether to add lime.
Treat color change observations from a kit as estimates, not exact measurements. Adjust gradually, retest, and avoid unnecessary applications.
Watch Hydrangea Health as pH Changes
As the pH shifts, watch your hydrangea’s leaves and growth for signs of stress. Check the newest leaves first: yellowing between green veins may signal trouble absorbing nutrients, while brown edges can point to stress. Note whether the plant produces healthy new shoots and whether existing leaves stay firm.
Keep hydrangea hydration steady as you observe changes. Feel the soil before watering; it should stay evenly moist, not waterlogged. Dry soil can cause wilting that looks like a pH problem, while soggy roots can also weaken growth. Look for several signs together rather than reacting to one leaf.
Give your plant time to respond, since visible alkaline effects may develop gradually. Record leaf color, flowering, and growth so you can compare observations over several weeks. If symptoms worsen, pause further soil amendments and consider whether watering, drainage, pests, or nutrient availability could be contributing. These checks help you distinguish adjustment stress from other causes without making abrupt changes.
Keep Hydrangea Soil pH in Range
Test your soil’s pH regularly to make sure it stays in the range your hydrangeas need. If the reading changes, adjust the soil gradually, then test again. This simple routine helps keep conditions stable and supports healthy growth.
Test Soil pH
The first step is to find out your soil’s current pH, since hydrangeas grow best within a suitable range. A test gives you a reliable starting point before you consider adding lime. It also helps you understand your soil chemistry and choose appropriate lime timing, rather than guessing from plant appearance.
- Collect samples from several spots around the hydrangea’s root zone. Remove mulch, leaves, and surface debris first.
- Mix the samples in a clean container, then follow the directions on a home soil test kit. For a more precise reading, send a sample to your local cooperative extension or a soil-testing laboratory.
- Record the result and note where you sampled. Check that the test reports pH, not just nutrient levels, so you can make an informed decision about alkalinity.
Monitor and Adjust pH
Once you know your soil’s pH, monitor it over time and adjust gradually to keep it in the range you want. Retest every few months during the growing season, especially after heavy rain or adding amendments.
Hydrangeas generally prefer slightly acidic soil, so raise pH only if your chosen variety needs more alkaline conditions. Follow your soil test’s lime recommendation, and don’t add extra to speed results; lime works slowly, and excess can limit nutrient availability.
When applying lime, spread it evenly across the root zone and water it in. Check the product label for application rates and lime sourcing, since materials differ in strength and texture consistency.
Retest after several months before making another adjustment. Keep notes on readings, products, and amounts so you can track changes and avoid overcorrecting your soil.
Frequently Asked Questions
Can Raising Soil pH Change My Hydrangea’s Flower Color?
Yes—raising soil pH can change your hydrangea’s flower color, but only for certain varieties. The effect is strongest in bigleaf and mountain hydrangeas: higher pH generally produces pinker flowers, while lower pH often encourages blue.
Soil acidity affects aluminum availability, which influences pigment development. White hydrangeas usually won’t change color, and results can take a season or longer to appear.
Which Hydrangea Varieties Respond to Soil pH Changes?
Bigleaf hydrangeas (Hydrangea macrophylla) and mountain hydrangeas (H. serrata) respond most noticeably to soil pH effects: acidic soil can produce blue flowers, while alkaline soil often yields pink ones. You’ll see this change only in varieties with responsive pigments, and white-flowered cultivars generally stay white.
Among hydrangea varieties, lacecap and mophead types may both shift color. Oakleaf, panicle, and smooth hydrangeas usually don’t change flower color when you alter soil pH.
How Long Does It Take Hydrangeas to Show a Flower-Color Change?
You’ll usually see a flower-color change in the next growing season, though it can take several months to a year after you adjust soil conditions. The change timing depends on the hydrangea variety, soil pH, and aluminum availability, so test your soil and give it time.
Color permanence isn’t guaranteed: blooms may shift again if soil conditions change, and some varieties won’t change color at all.
Can I Grow Hydrangeas in Containers With Alkaline Soil?
Yes, you can grow hydrangeas in containers with alkaline soil. Choose a pot with drainage holes, and prioritize container drainage to prevent waterlogged roots.
Use a quality potting mix amended with alkaline compost, then monitor soil pH because watering and nutrients can shift it over time. Pick a hydrangea suited to your climate, water when the top inch feels dry, and feed lightly during the growing season. Repot when roots crowd the container.
What Plants Grow Well Alongside Hydrangeas in Alkaline Soil?
You can pair hydrangeas with alkaline-tolerant plants such as lavender, salvia, catmint, yarrow, dianthus, and many roses. Choose companions that suit your light and moisture conditions; hydrangeas generally prefer richer soil and more consistent moisture than lavender.
For effective companion planting, group plants with similar needs near each other, and use successional planting to stagger blooms. That way, you’ll enjoy color and interest across more of the growing season.
Conclusion
You can make soil more alkaline for hydrangeas, but patience protects your plants. Test first, choose lime carefully, and follow the label rather than rushing results.
Retest before adding more, and watch for healthy leaves and steady growth as the pH shifts. With measured, mindful care, you’ll give your hydrangeas a better chance to flourish.
Keep the soil in range, and let your blooms reward your thoughtful work with a brighter, more beautiful garden. These steps to make soil alkaline for hydrangeas can help you create the conditions they need to thrive.